Written by: Daniel Koren, Co-Founder, Frameology
Key takeaways
-
An eclectic gallery wall feels intentional when you follow a clear process that includes assessing the wall, choosing an anchor piece, and planning consistent spacing.
-
Cohesion comes from a unifying thread such as a shared frame finish or color palette, so you can mix sizes, styles, and mediums without the arrangement feeling chaotic.
-
Keeping 2–4 inches of consistent spacing between frames and testing the full layout on the floor with a gallery wall template helps prevent crooked hangs and unnecessary wall holes.
-
Pre-designed gallery walls with life-size templates simplify ordering and installation, so you can get a polished result in under 30 minutes without professional help.
-
Ready to bring your own eclectic gallery wall to life? Explore Frameology’s Classic and Luxe collections for ready-to-hang options with included templates.
6-step overview
-
Assess your wall and choose an anchor piece.
-
Select a mix of frame styles and mediums with a unifying thread or find a ready-to-hang layout that suits you.
-
Order your frames or a pre-designed gallery wall.
-
Plan consistent spacing of 2–4 inches between frames. **
-
Create a paper or digital mock-up and test it on the floor. **
-
Install using life-size gallery wall templates.
** Skip steps 4 and 5 if you order a Classic or Luxe gallery wall with Frameology!
Step 1: Measure your wall and choose an anchor piece
Start by measuring your wall and noting what surrounds it. The most reliable sizing formula is the two-thirds rule: your gallery wall should cover roughly two-thirds of the space above any furniture beneath it. Above a six-foot sofa, that means your arrangement should span approximately four feet wide. In a hallway or staircase with no furniture anchor, center the overall arrangement so its midpoint sits 57–60 inches from the floor.
After you know your boundaries, choose an anchor piece that sets the tone. A large painting, a statement photograph, or a decorative mirror works well as the focal point you build around. Selecting one piece that is 30–40% larger than the surrounding works establishes visual hierarchy and gives the eye a natural place to land first.
Step 2: Mix frame styles and mediums with one unifying thread
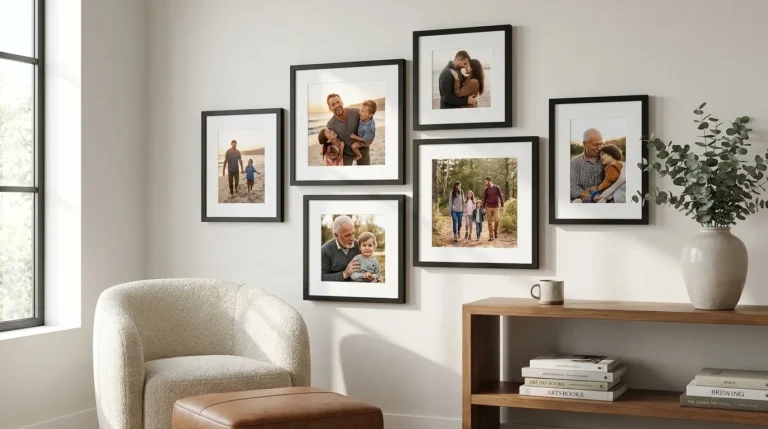
Eclectic does not mean random, so you need a clear thread that ties everything together. The secret to a gallery wall that looks collected rather than chaotic is a unifying element that repeats across the arrangement. A shared color palette, such as mostly black-and-white pieces with small color accents, is one of the most effective ways to create cohesion when you mix frames and artwork of different styles.
That thread can also be a frame finish. Choosing frames in the same color family, such as all matte black, all natural wood, or all warm gold, lets you vary the molding profile and size without losing cohesion. Mixing artwork mediums, including photographs, prints, sketches, and three-dimensional pieces, adds depth and visual interest while a unified color palette keeps everything feeling intentional.
Frameology’s Gallery Wall Collection makes this step straightforward. Classic frames (starting at $59 for a Classic Wall) deliver strong value and fast shipping, with a removable backing so you can swap photos over time. Luxe frames (starting at $79 for a Luxe Wall) are 100% made in the USA from premium solid wood and metal moldings with museum-grade acrylic, which creates a permanent, editorial result. Both lines are available in finishes that mix naturally within a single arrangement.
Step 3: Order frames or a pre-designed gallery wall
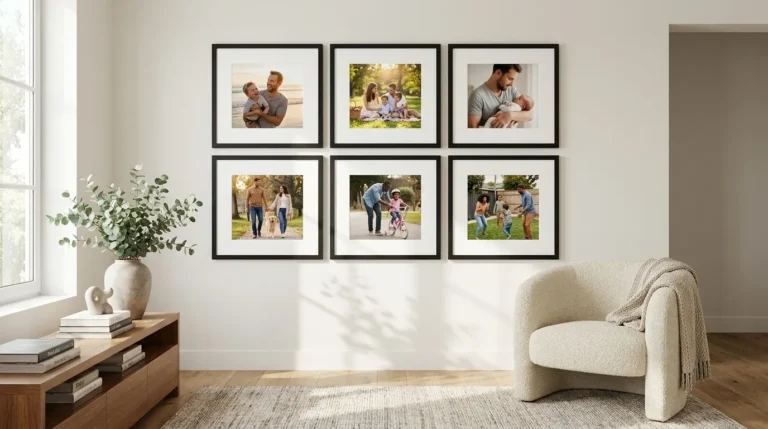
Once your layout is confirmed, move from planning to purchasing. You have two paths: build the arrangement yourself frame by frame, or order a pre-designed gallery wall with every frame already sized and coordinated for the layout.
For a straightforward starting point, the Classic Stack ($225) is a clean, versatile arrangement that works above a sofa or console. For a museum-quality editorial result, the Luxe Diptych ($638) from the Bobby Berk x Frameology collaboration delivers a refined two-frame layout with top-of-the-line materials, 100% made in the USA.
One distinction matters before you order. Classic and Luxe gallery walls include a life-size gallery wall template for installation. Canvas galleries and gallery walls created through the Gallery Wall Design Service ($99+) do not include a gallery wall template. If template-guided installation is a priority for you, choose Classic or Luxe.
Step 4: Plan consistent spacing of 2–4 inches between frames
If you decided to DIY your own gallery wall, decide how much space to leave between each piece. You may skip to step 6 if you ordered a Luxe or Classic gallery wall.
Spacing is the detail that separates a polished gallery wall from one that feels off. Keeping gaps between frames consistent at 2–3 inches creates visual cohesion while allowing each piece to retain its individual identity. For three or more frames hung in a row or an organic cluster, a standard gap of 2–4 inches between each frame prevents a crowded or disconnected appearance.
The exact number matters less than the consistency, because your eye reads the rhythm of the gaps before it notices individual pieces. Pick a gap, such as 2.5 inches for most living-room arrangements, and hold to it across the entire wall. Inconsistent spacing is the most common reason a gallery wall looks unfinished, even when the individual frames are beautiful.
For hallway and staircase layouts, the same spacing rule applies, but the arrangement follows the diagonal of the staircase rather than a horizontal baseline. Layouts like the Classic Staircase ($308) are pre-designed with this diagonal spacing already solved.
Step 5: Test your layout with a mock-up on the floor
This planning step prevents most hanging regrets. Arranging frames on the floor first and using a gallery wall template cut to frame sizes and taped to the wall lets you test spacing, proportion, and balance before any nails go in.
Lay your frames on the floor in the arrangement you have in mind, then step back and photograph it so the camera can reveal spacing and proportion issues your eye might miss up close. Review the image and adjust until the layout feels balanced, which does not require symmetry, but should feel evenly weighted. Using painter’s tape to lay out the full arrangement on the floor before hanging is a reliable way to test spacing and balance.
After the floor layout feels right, cut paper to the size of each frame, label each piece, and tape them to the wall. This gives you a true-to-scale preview without a single nail hole. If something feels off, peel the tape and adjust. This process takes about 20 minutes and can save hours of patching.
For a deeper look at the planning process, Frameology’s blog covers gallery wall layout ideas and step-by-step guides that are worth bookmarking before you start.
Step 6: Install using life-size gallery wall templates
Installation is where Frameology’s Classic and Luxe gallery walls stand out. Every Classic and Luxe gallery wall ships with a custom, life-size gallery wall template, which is a printed paper guide that maps the exact nail positions for your specific layout.
For Classic gallery walls, tape the template to the wall, hammer the included hardware into the marked spots, remove the template, and hang your frames. The entire process takes less than an hour with zero unnecessary holes. House Beautiful contributor Janae McKenzie put it plainly: “I would absolutely recommend Frameology to anyone who knows they want a gallery wall, but doesn’t know how to make it happen.”
For Luxe gallery walls, the process involves a couple of additional steps because of the dual-point hanging system. Each Luxe frame hangs from two side points for precise leveling and strong stability. The gallery wall template accounts for this by marking both hanging points per frame so alignment stays exact. CNN Underscored’s review of the Luxe Bricklay found that taping the custom gallery wall template to the wall and nailing in the provided hardware resulted in perfectly aligned frames without misalignment.
All necessary hanging hardware, including nails, a mini-level, and the hanging system, comes in the box with every Luxe gallery wall. Classic gallery walls include the hardware marked on the template. Neither option requires a professional installer.
Explore ready-to-hang gallery walls with included templates, because both Classic and Luxe collections come with life-size guides for effortless installation.
Troubleshooting common gallery wall issues
The layout feels sparse after hanging: Add a smaller filler piece, such as a four-by-six photograph, a simple print, or a frameless accent, to close the gap. This approach works naturally with eclectic gallery walls because they are designed to grow and evolve rather than remain static.
Spacing looks uneven on the wall: Step back and photograph the wall, since uneven spacing often shows more clearly in a photo than in person. If one gap reads noticeably wider, remove that frame, fill the hole, and re-hang using a gallery wall template or paper guide to re-mark the position. Consistent 2–3 inch gaps usually solve the problem.
The arrangement feels visually heavy on one side: Balance does not require symmetry, but both sides should feel similar in visual weight. Redistribute that weight by moving a larger frame toward the lighter side, or add a smaller piece to balance the composition. Asymmetrical layouts can add a creative, dynamic feel as long as overall balance is maintained across varied sizes and shapes.
You want to update photos over time: Classic frames feature a removable backing, so swapping photos stays simple whenever you want a seasonal refresh or have new memories to display. Luxe frames have a sealed, permanent kraft paper backing designed to protect the photo permanently, so photos cannot be swapped once framed.
Frequently asked questions
What is the best spacing between frames on an eclectic gallery wall?
A gap of 2–3 inches between frames is the standard recommendation for most residential gallery walls. For larger frames or more dramatic arrangements, spacing can extend to 4 inches. The most important factor is consistency, because keeping the same gap throughout the arrangement creates visual cohesion even when frame sizes and styles vary significantly.
How do I create cohesion when mixing different frame styles?
Choose one unifying element and repeat it across the entire arrangement. The most effective options are a consistent frame finish, such as all matte black, all natural wood, or all warm gold, a shared color palette in the artwork, or a consistent mat color. Mismatched frame profiles and sizes work well in an eclectic gallery wall as long as that one thread runs through the whole arrangement.
Do all gallery walls include hanging templates?
Classic and Luxe gallery walls include life-size gallery wall templates that make installation simple and straightforward. Canvas galleries, Metal galleries, and gallery walls created using Frameology’s Gallery Wall Design Service do not include templates because their construction and customization work differently and often require more tailored installation approaches.
What is the two-thirds rule for gallery walls?
The two-thirds rule helps you choose the right scale for your gallery wall based on the furniture beneath it. Your arrangement should cover roughly two-thirds of the wall space above that piece, which keeps the display feeling proportional rather than too small or too large.
What is the difference between Classic and Luxe gallery walls?
Classic gallery walls use Classic frames, which deliver strong value and fast shipping. Classic frames feature a removable backing so photos can be swapped over time, and Classic gallery walls typically install in under an hour using the included life-size gallery wall template. Classic gallery walls start at $198.
Luxe gallery walls use Luxe frames, which are 100% made in the USA from premium solid wood and metal moldings with museum-grade acrylic. Luxe frames have a sealed, permanent kraft paper backing and hang from two side points for precise leveling. All hanging hardware, including nails and a mini-level, comes in the box. Luxe gallery walls start at $638 and include a life-size gallery wall template with instructions tailored to the dual-point hanging system.
Bring your eclectic gallery wall to life
An eclectic gallery wall succeeds when the planning is intentional, the spacing is consistent, and the installation feels straightforward. Frameology’s Classic and Luxe gallery walls handle the hardest part, which is the installation, with life-size gallery wall templates that remove the guesswork from every nail hole. With over 7,300 verified five-star reviews and a 4.98/5 rating, Frameology has helped more than one million frames find their walls.
Browse Classic and Luxe gallery walls to find the right starting point for your eclectic arrangement.