Last updated: March 27, 2026
Key takeaways
- Hang pictures with centers at 57-60 inches from the floor for eye-level viewing, and follow the two-thirds rule over furniture for balance.
- Use the tape method to mark nail positions accurately, and hammer nails at a 45-degree angle for a secure hold.
- Gallery walls install easily with Frameology’s templates, so you can tape on the gallery wall template, nail through marks, and hang frames in under 30 minutes.
- Choose hardware rated 25-50% above frame weight, and use Command strips for lightweight Classic frames under 10 pounds when you need a renter-friendly option.
- Avoid common mistakes like hanging too high by previewing with AR tools, and get pro results with Frameology’s easy-install frames.
Essential tools and picture hanging hacks for perfect results
Gathering the right tools before you hammer a single nail sets you up for a professional-looking result. Your basic toolkit should include a pencil for marking, a measuring tape, a level or smartphone level app, painter’s tape, and appropriate hanging hardware. For renters or anyone who wants to avoid holes entirely, Command strips work well for lightweight Classic frames under 10 pounds and remove cleanly.
Professional framers rely on the tape method for accurate nail placement. Measure the distance between your frame’s hanging points, mark that distance on a strip of painter’s tape, then transfer the tape to your wall. This simple trick reduces measurement errors and keeps your nails perfectly spaced. The industry standard hanging height follows 57-60 inches from the floor to the center of the artwork at eye level for most viewers.
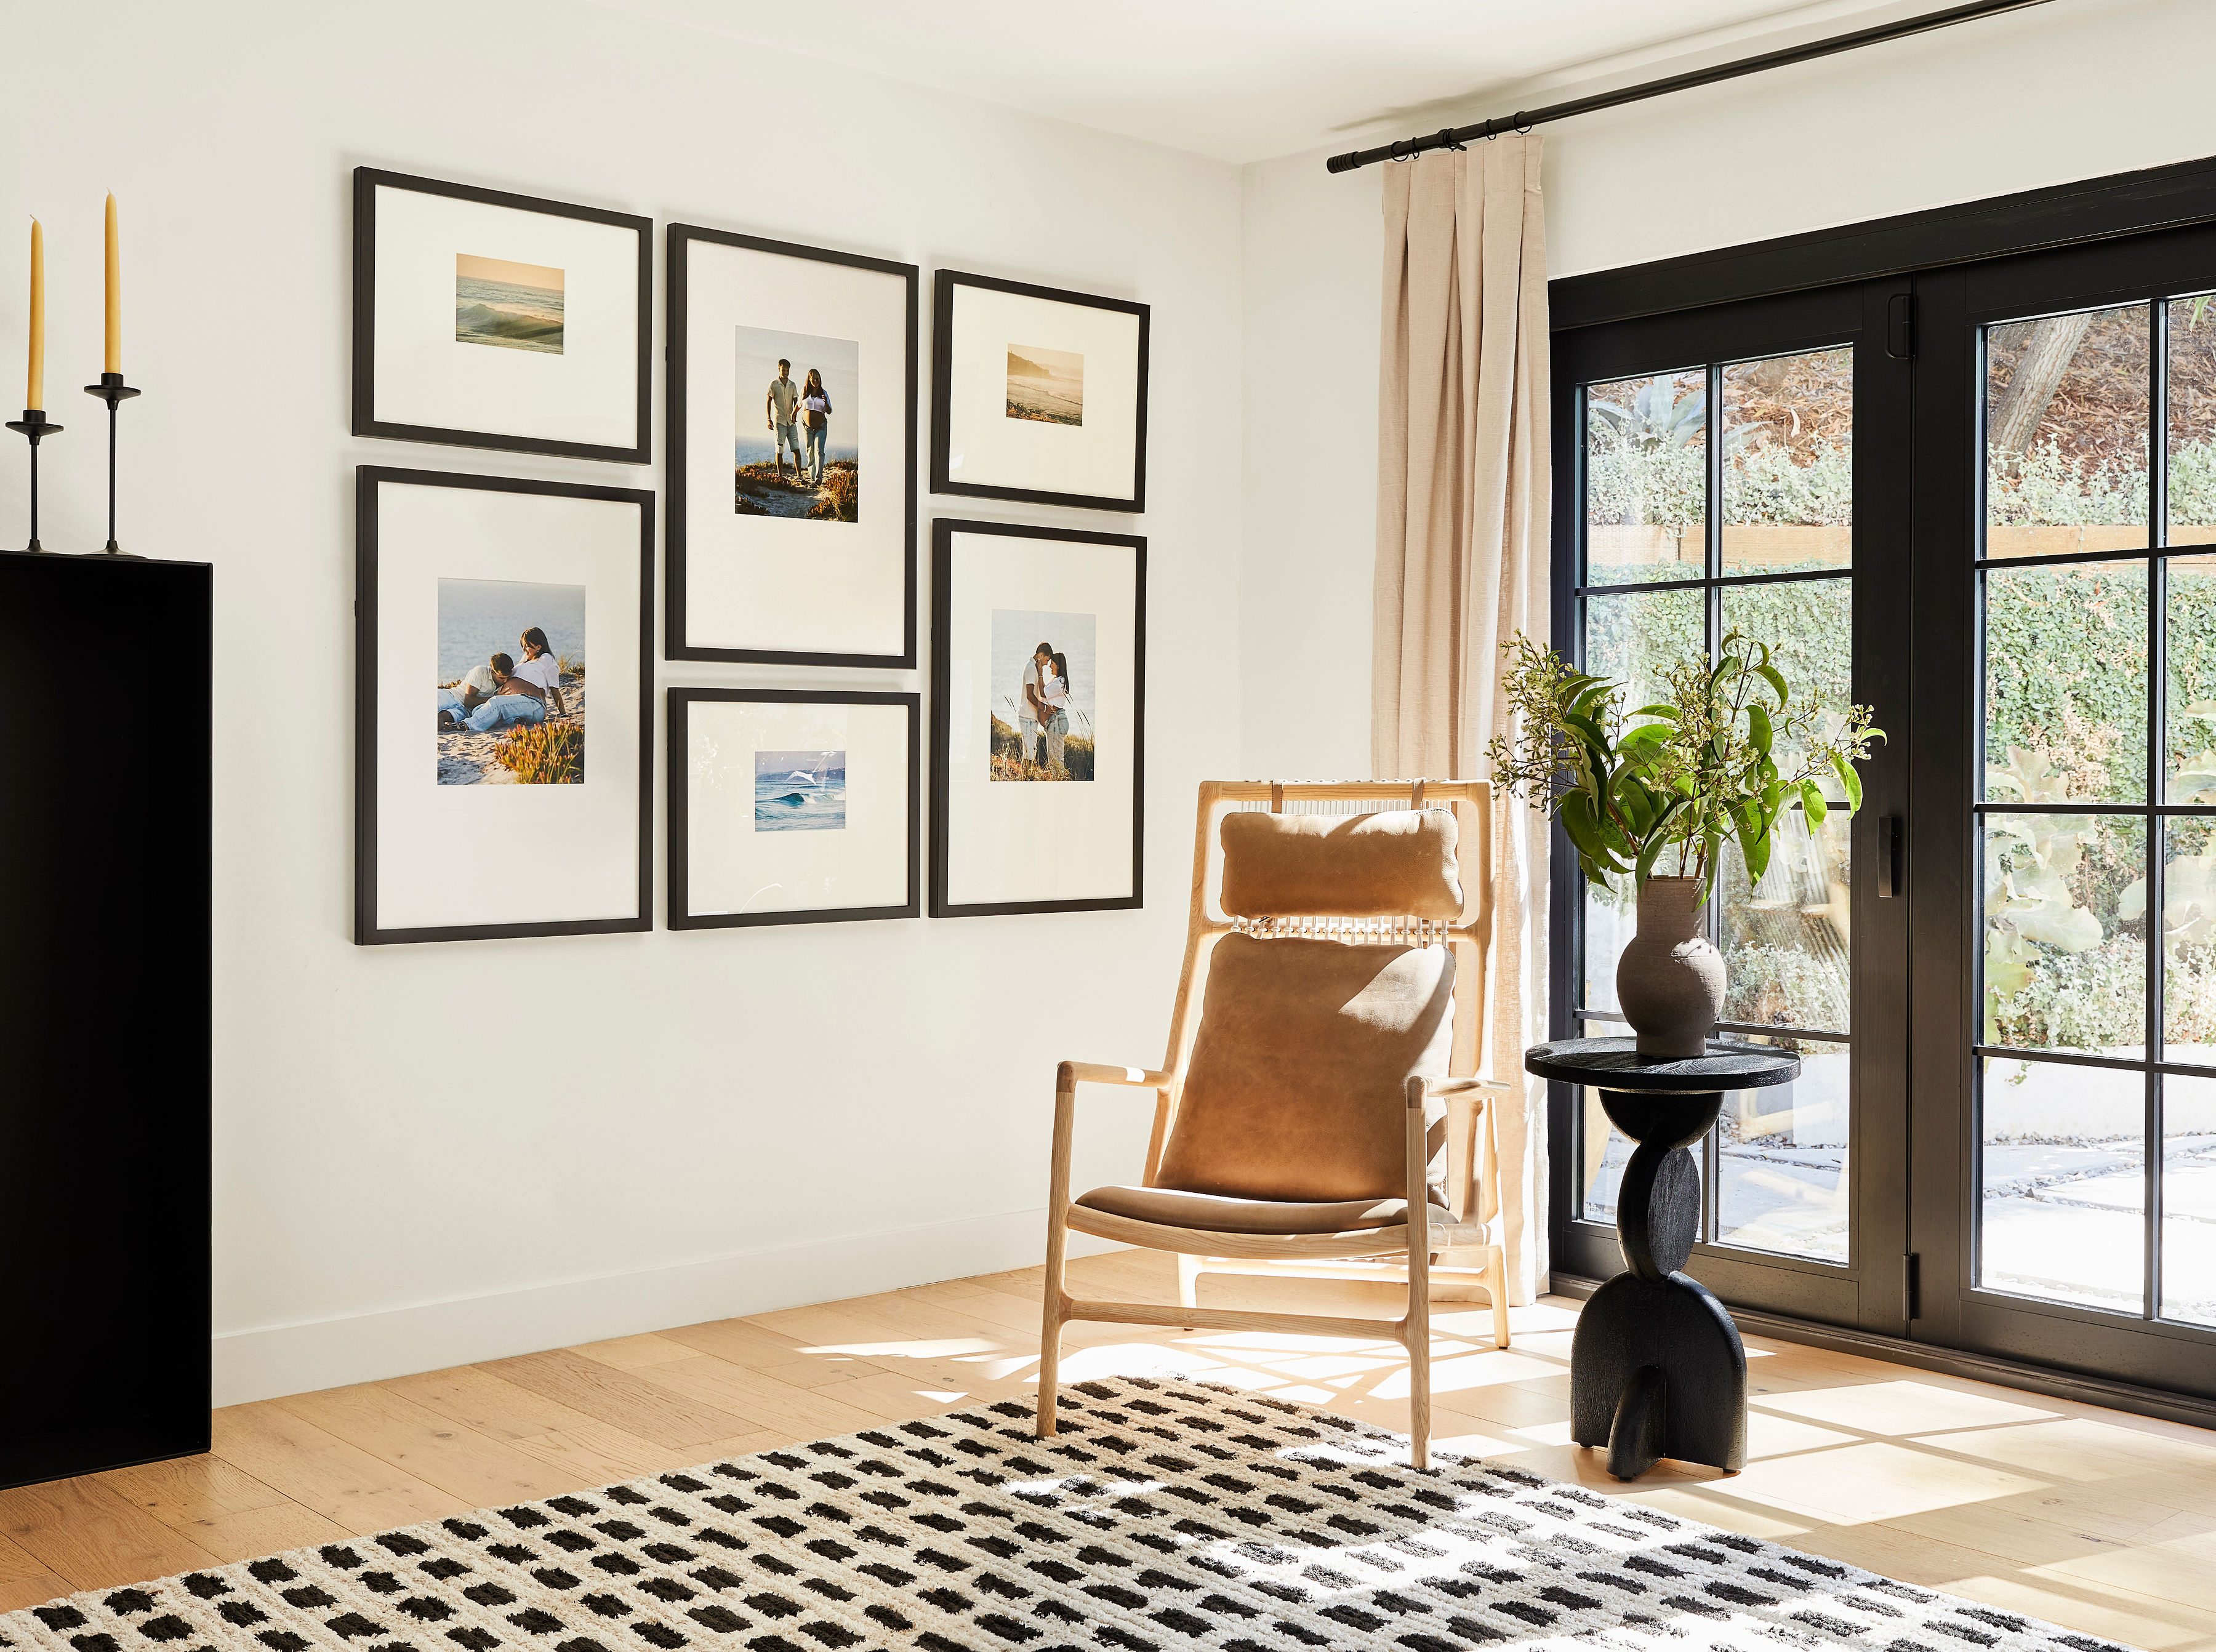
For gallery walls and multiple frames, the two-thirds rule creates reliable visual balance. Aim for artwork that spans roughly two-thirds the width of the furniture beneath it. When hanging above sofas or consoles, keep 6-8 inches between the furniture top and the frame’s bottom edge. Heavy frames need anchors and hardware rated 25-50% above the frame’s actual weight for safety, so check packaging before you buy. With these tools and principles in place, you are ready to follow a clear method for hanging a single frame.
How to hang a single picture frame straight: A foolproof method
Perfect picture hanging follows a simple, repeatable process that removes guesswork. Start with Frameology’s mobile augmented reality tool to preview how your frame will look on your wall, so you can confirm placement before you make any holes. Next, measure up to your target height, using the 57-60 inch standard discussed earlier, and mark the center point with a light pencil mark.
Measure the distance from your frame’s hanging hardware to its center, then subtract this measurement from your wall mark to find your nail placement. This step ensures the frame’s center lands at your chosen height. To transfer this measurement accurately, use the tape method: place painter’s tape on your wall, mark the nail positions, and double-check with a level before you hammer. If your frame uses wire instead of fixed hardware, pull the wire taut and measure from the frame’s top edge to the wire’s highest point, since that spot will rest on the nail.
Hammer your nails at a 45-degree upward angle for strong holding power, and leave about 1/4 inch protruding from the wall. Before you hang the frame, place a small level on top to confirm it is straight, then carefully position it on the nails. Make final adjustments by gently lifting one corner or nudging the frame until it looks even.
This method works perfectly for Frameology’s Classic Wall frames starting at $59, which ship next business day and include center hanging hardware, though you provide your own nails and level. For a more premium experience, Luxe Wall frames starting at $79 include a complete hanging kit with dual-point hangers, nails, and a mini-level, all made in the USA with museum-quality materials.
How to hang multiple picture frames or a gallery wall perfectly spaced
Gallery walls can feel like the biggest challenge in picture hanging, yet a clear plan makes them manageable. Professional designers recommend spacing individual frames 2-3 inches apart and treating the entire group as one cohesive unit. Plan your layout on the floor first, adjust until it feels balanced, then transfer those measurements to your wall.
Frameology has simplified gallery wall installation with their viral gallery wall templates. Classic gallery walls starting at $198 include a life-size gallery wall template that makes installation feel almost automatic. You simply tape the gallery wall template to your wall, hammer nails through the marked spots, remove the template, and hang your frames. The entire process leaves zero unnecessary holes and gives you a polished result.
For premium installations, Luxe gallery walls starting at $638 use the same gallery wall template system but add dual-point hanging hardware for precise leveling and long-term stability. The Luxe installation process uses two hangers per frame, so your gallery wall stays aligned over time. Both Classic and Luxe options have gone massively viral on social media, with over 15 million combined views on Instagram and TikTok.
The augmented reality preview lets you test different layouts before you commit to a final arrangement on the wall. Interior designer Bobby Berk notes about gallery walls, “The fact that it comes with a template for hanging makes it so much easier than trying to do this on your own!”
Canvas and Metal gallery walls do not include a gallery wall template because they require different hanging approaches, so plan your layout carefully if you choose these options.
Renter-friendly hanging ideas and safe options for heavy picture frames
Renters often need damage-free ways to hang artwork, and several reliable options exist. Command strips work well for lightweight Classic frames under 10 pounds and remove without harming walls. Picture ledges and easel stands give you nail-free alternatives for displaying framed art in style.
Heavy frames call for extra care to keep both people and walls safe. Professional installers recommend choosing hardware rated 25-50% above your frame’s actual weight so it can handle movement and occasional bumps. For drywall, use toggle bolts or molly bolts for frames over 20 pounds, and locate studs whenever possible for maximum support.
Frameology’s lightweight canvas prints starting at $19 and metal prints starting at $65 give renters and homeowners attractive options with less weight. The Luxe line’s dual-point hanging system adds stability even for larger frames by spreading weight across two mounting points.
Common picture hanging mistakes and pro tips from decades of framing
Most picture hanging mistakes fall into a few patterns, such as hanging artwork too high, ignoring how frames relate to nearby furniture, or underestimating frame weight when choosing hardware. Many people also rush through measuring, which often leads to uneven spacing in gallery walls or slightly crooked single frames.
Professional framers suggest using the step back and squint test to catch issues. Stand across the room, narrow your eyes slightly, and look for misaligned edges or awkward gaps that are not obvious up close. Always use a level, even when the frame looks straight at first glance. For gallery walls, lay out your arrangement on the floor and take a photo, then use that image as a guide while you hang.
Frameology’s augmented reality tool prevents many common mistakes by letting you preview your exact frame on your actual wall before you buy. As customer Paula R. shared in her five-star review, “Ordered on Monday, on the wall by Friday! Beautifully framed pictures that I am proud to hang on my walls… at a great price!”
The 57-60 inch center height rule works well in most rooms, yet you can adjust it for your space. In rooms where people usually sit, such as bedrooms or living rooms with low furniture, consider hanging slightly lower for a more comfortable viewing angle.
How to hang picture frames: FAQ
What is the best way to hang a picture frame?
The best method combines thoughtful planning with sturdy hardware. Start by using augmented reality to preview your frame’s placement, then measure 57-60 inches from the floor to the frame’s center. Use the tape method to mark nail positions accurately, and choose hardware that matches your frame’s weight. For single frames, one centered nail works in most situations, while gallery walls benefit from a gallery wall template that removes guesswork.
What is the 2/3 rule for hanging pictures?
The two-thirds rule says that artwork should span about two-thirds the width of the furniture beneath it. For example, above a 90-inch sofa, your frame or gallery wall should measure roughly 60 inches wide. This proportion creates visual balance and keeps artwork from looking too small or overwhelming in the space. You can apply the rule to both single large pieces and grouped arrangements.
How do you hang a picture on the wall with two hooks?
Two-hook hanging gives you better stability and helps prevent tilting. Measure the distance between your frame’s hanging points, then transfer this measurement to your wall using painter’s tape. Check that both marks are level before you hammer nails. This approach works especially well for wide frames, heavy pieces, or frames with D-rings on each side instead of a center wire.
Can I use Command strips on picture frames?
Yes, but with important limits. Command strips work for lightweight frames under 10 pounds, and you should only use them on Classic frames with removable backings. Never use Command strips on Luxe frames, because removing them could damage the permanent sealed backing. Always clean the wall surface before you apply strips, and follow weight limits closely to avoid falling frames.
How long does it take to hang a gallery wall?
With the right gallery wall template, gallery wall installation becomes surprisingly quick. Frameology’s Classic gallery walls with included templates can be hung in under 30 minutes. Luxe gallery walls take slightly longer because of their dual-point hanging system. Without any template, most gallery walls require 1-2 hours of measuring, marking, and adjusting.
How can I hang pictures without making nail holes?
Several damage-free options help renters and homeowners avoid nail holes. Picture ledges, easel stands, and leaning frames against walls create stylish displays without hardware. For lightweight pieces, Command strips, removable adhesive hooks, or picture hanging strips provide secure mounting that removes cleanly. Frameology’s lightweight canvas or metal prints also work well for easier damage-free hanging.
Hang your memories perfectly with Frameology
Successful picture hanging combines clear techniques with frames designed for easy installation. Whether you choose Classic frames for strong value and fast shipping or Luxe frames for museum-quality results with included hardware, planning your approach and using proven methods will give you a polished look.
Frameology’s gallery wall templates, augmented reality previews, and 30+ years of framing expertise remove the guesswork from displaying your favorite memories. With over 7,200 verified five-star reviews and a 4.98/5 star rating, customers consistently achieve professional results at home. Start framing your favorite memories at Frameology and see why they are the #1 choice for online custom framing.
